Sharing Control with Salesforce Experience Cloud Users Outside Your Organization
Before diving into the specifics of sharing control with Salesforce Experience Cloud users, let us look into a use case of when this functionality would be used. Let us imagine you have a business that engages in B2B commerce. Your business has a few workers who are partners, meaning they are not officially employed by your organization. In Salesforce terms, they would be considered external users. Since they are not direct employees, you do not want to share any sensitive data with these workers. Instead, we want to disclose only specific data based on the business need.
Now that we have a use case, let us establish the meaning of sharing within Salesforce. Sharing enables the record owner or any user with full access to a record to share it with another user or group of users. Salesforce provides two kinds of sharing:
- Sharing Internal Access (here we can share records with internal users): A user with an internal license can access the internal Lightning Experience or Salesforce Classic.
- Sharing External Access (here we can share records with external users): A user with an external license (Limited access) can access only the Experience Cloud sites that the user is a member of. An external user can't access the internal Salesforce Classic or Lightning Experience.
In this blog, we will discuss the Sharing of the following external access:
- Default External OWD Access
- Sharing Rules
- Partner Role Hierarchy
- Grant Super Access for Partner or Customer Plus User
- Sharing Sets
- Sharing Groups
- External Account Hierarchies
- Apex Managed Sharing
- Account Relationship Data Sharing
External organization-wide defaults provide separate organization-wide defaults for external and internal users. They simplify your sharing rule configuration and improve recalculation performance. Additionally, you can easily see which information is being shared with external users.
1.1 Use Case.
For example, we consider a one company company have all holidays. Holidays will be visible to all the employees in this case we will update holiday record access to PUBLIC READ ONLY.
1.2 Implementation:
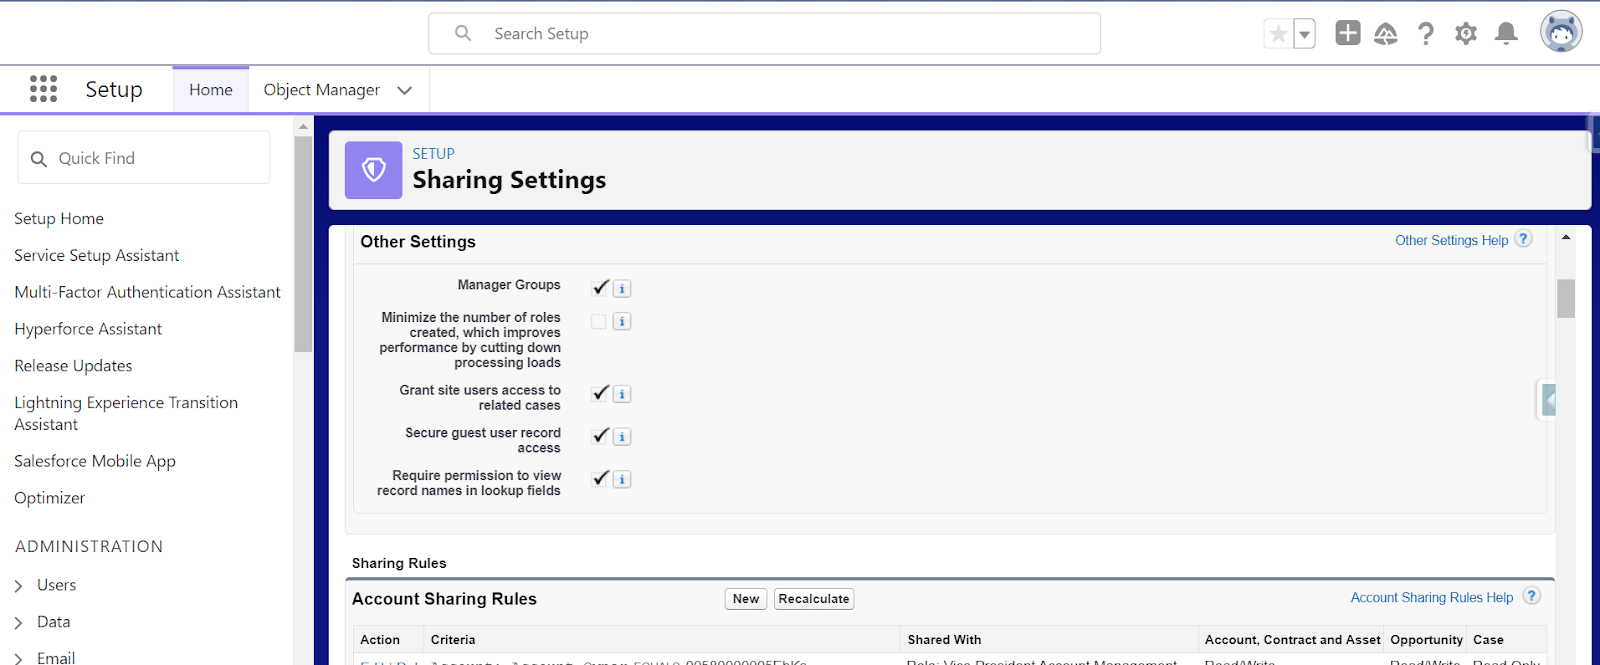
Once you have logged in to Salesforce, select the Setup icon. Search for "Sharing Settings" using the Quick Find checkbox after that. To enter the sharing settings page, click on it. Then, click on Edit to grant External OWD access.

External organization-wide defaults enable you to set a different default level of access for external users such as PRIVATE, PUBLIC READ ONLY, PUBLIC READ WRITE, and PARENT CONTROL. By default, the access level is set to "PUBLIC READ ONLY" for internal users and "PRIVATE" for external users.
Private: Users can only read and edit their user records when the default access is set to Private.
Public Read: The default access is set to Public Read, and users can only read other users' records.
Public Read/Write: The default access is set from Private to Public Read/Write, and users can read and edit other users' records.
Controlled by Parent: Users can perform actions (like view, edit, delete) on a record on the detail side of a master-detail relationship if they can perform the same action on all associated master records.
1.3 Limitations:
- External OWD access must be less than Internal OWD access.
- Any changes we make will be applied to all users.
2.1 Use Case:
Here we can share records with a particular role or group. For example Project Manager is there Manager who wants to see an employee leave duration of more than 10 days for that leave records shared with the manager.
2.2 Implementation:
Once you have logged in to Salesforce, select the Setup icon. Search for "Sharing Settings" using the Quick Find checkbox after that. To enter the sharing settings page, click on it. Then, click on ‘Manage sharing settings for’ and select which object you want to write the sharing rules.
Then click on the new button in the sharing rules below tab will open.

In sharing rules, we have three types of sharing options:
- Based on group membership.
- Based on the criteria
- Guest user, based on criteria
Based on group membership: Here we can share particular Group or role records with another Group or Role.
Based on the Criteria: Here we can share criteria-matched records to group or Role. If you want to use "Based on criteria," check the box; the screen will look like this: The criteria that match the records are shared with the Public group.
Guest user, based on the criteria: This sharing will make use of sharing records for guest users. A guest user is someone who has not authenticated (logged in) to our portal.
- The sharing rule grants guest users access to records without login credentials.
- If you desire, it will also include records owned by high-volume users.
- Guest users can have ‘Read Only’ access to other records.
2.3 Limitations:
- Customer Community users do not have Sharing Rules because the Customer Community does not utilize Roles.
- Sharing rules will support only the customer community plus, the partner community & external app users.
- We can define up to 300 sharing rules for each object including 50 criteria-based sharing or guest-user sharing rules.
3.1 Use Case:
For example, a manager needs to have access to all the data of the employees who report to him, but the employees have no access to the data that is only owned by their manager. Partner Role Hierarchy is to control the data access to the records on a salesforce object based on the job role of a user.
3.2 Implementation:
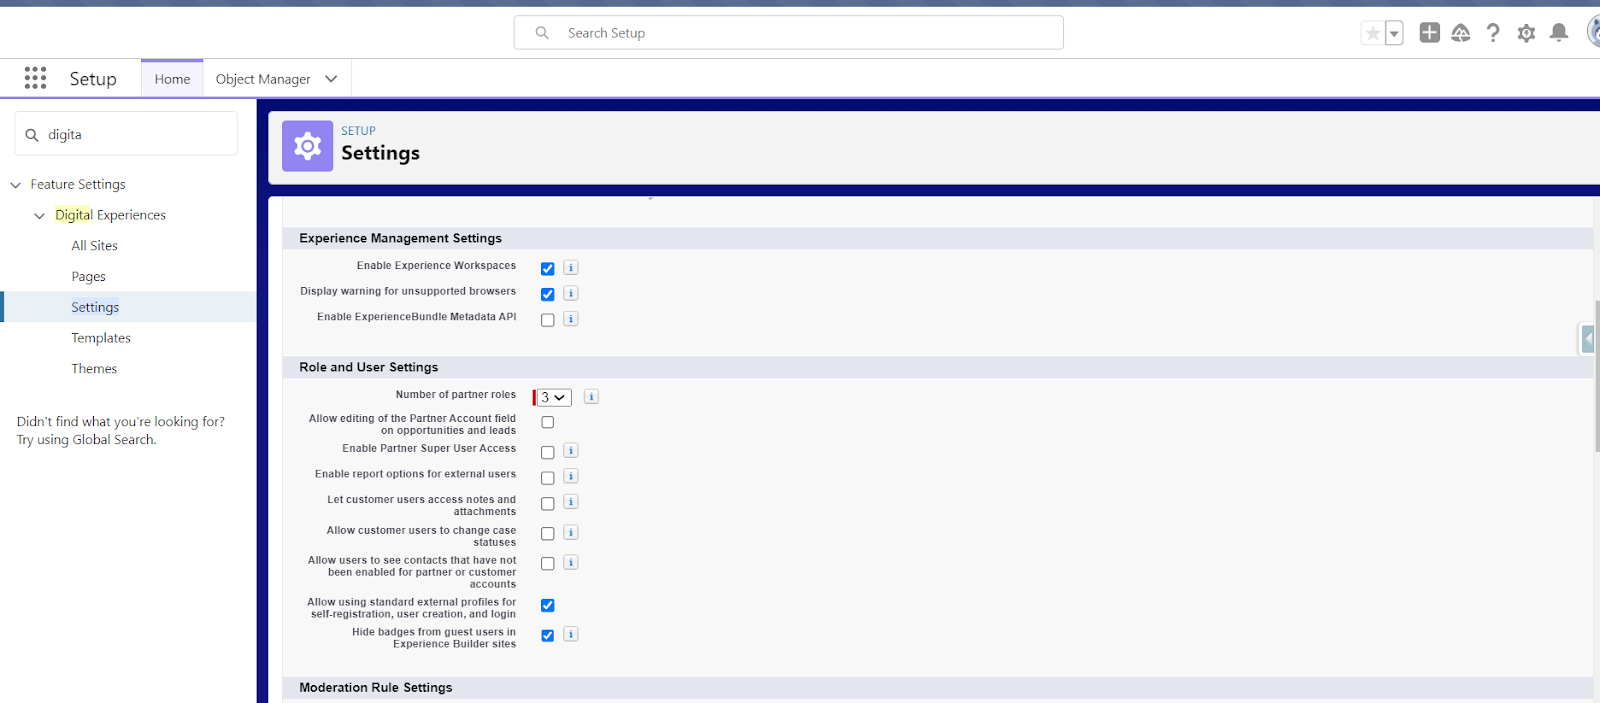
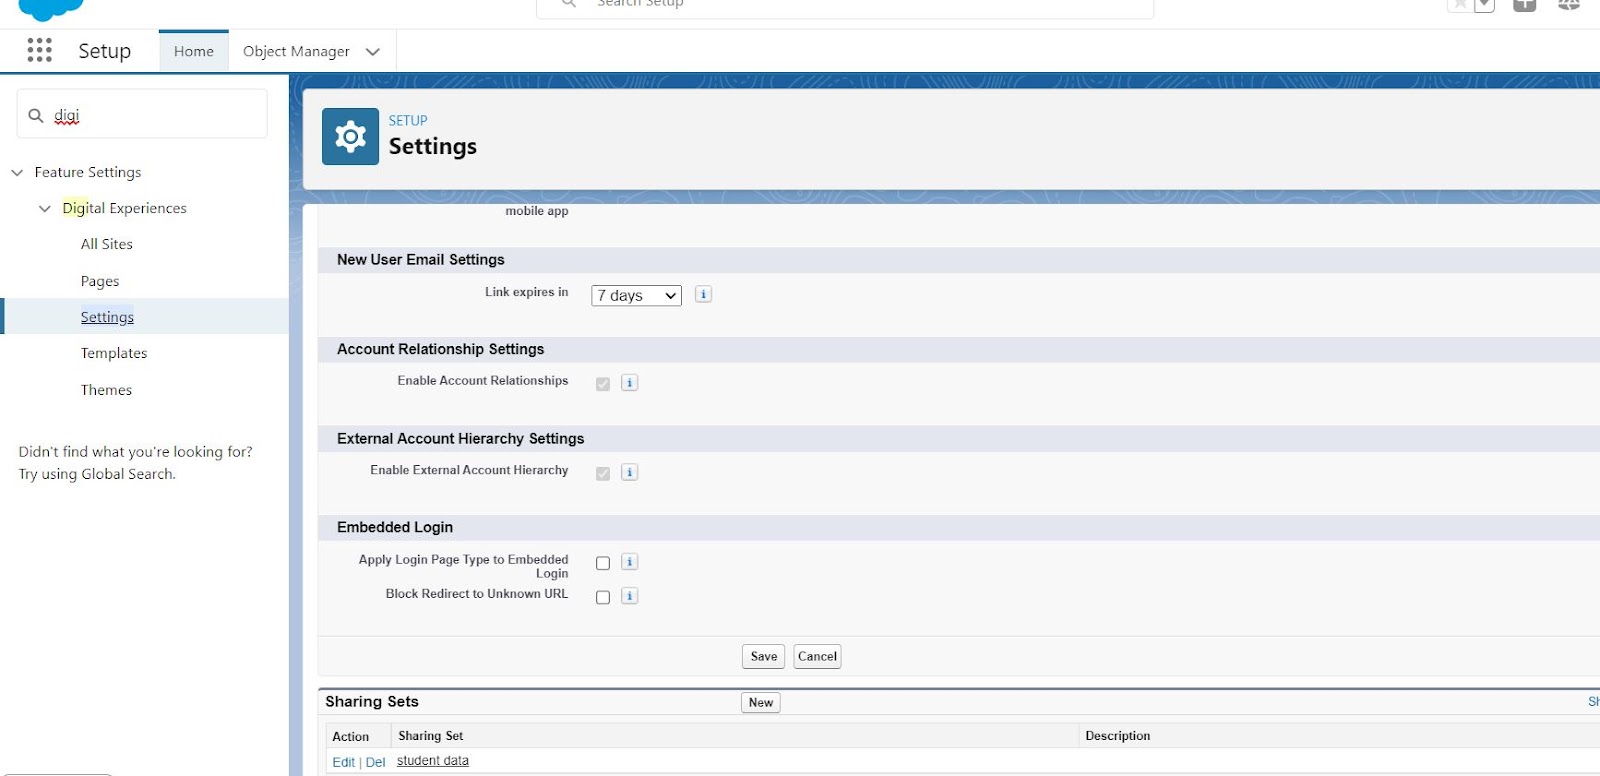
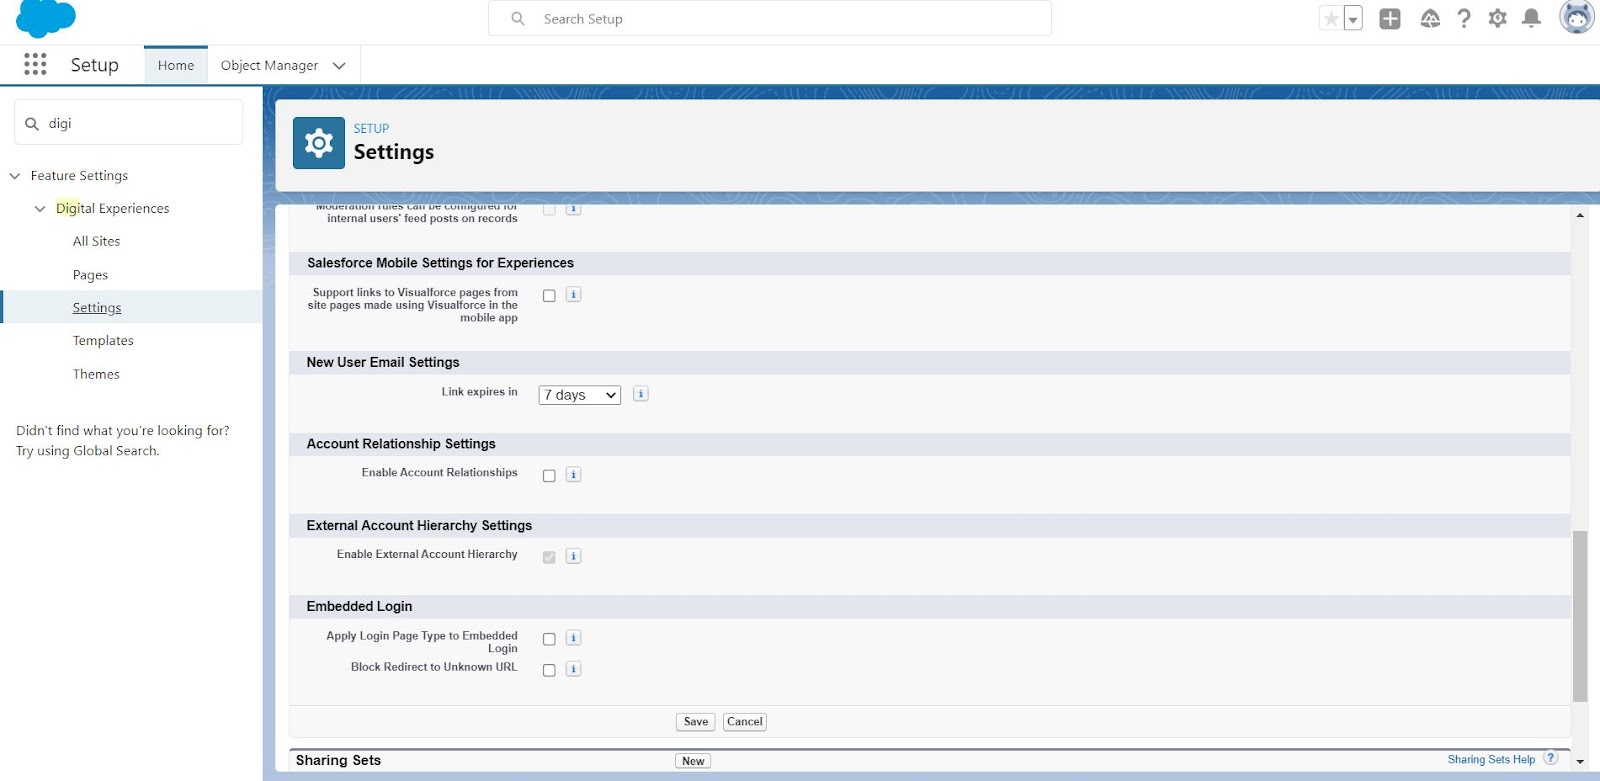
From Setup, in the quick find box enter Digital Experiences click on search, then click Digital Experiences, and click on the settings it navigates to the below page.
When you enable(create) the first external user on a partner account, a user role hierarchy is created for that account.
The three roles are:
- Partner User
- Partner Manager
- Partner Executive.
The records of the partner user are shared with the partner manager, and the records of the manager and user are shared with the executive. The role hierarchy rolls up to the account owner (the channel manager). When you create contacts on the partner account and convert them to external users, assign one of these roles to that user.
Note: By default, at least, role-level records are shared with the highest role.
3.3 Limitations:
- If you specify one partner role and later decide to increase the number of roles, the additional roles are not applied to existing partner accounts.
- We cannot share records with other account users or parent account users.
4.1 Use Case:
Super users can get insights into the records of other partners or Customer users who are at their role level or below them in the account role hierarchy. For example, we have a manager with full access to cases who are granted Superuser Access, then they can view and edit cases of other managers and their direct reports.
4.2 Implementation:
4.2.1 How to enable the Grant Super Access for Partner users:
First, go to the digital experience settings and enable the Enable Partner Super User Access.
Then view the contact record for the user on the partner account before that go to the contact page layout and add the “Enable super user access “ button after enabling the partner super access only it will be visible. If you're using Salesforce Classic, click Manage External Account, choose Enable Super User Access, and click OK. If you're using Lightning Experience, click the dropdown menu and select Enable Super User Access.
Note: To disable superuser access, deselect Enable Partner Super User Access. If you re-enable this feature, all users who were assigned super user access previously get superuser access again.
4.2.2.1 Partner Super Access Based on Role:
- Partner Executive: They can access records of all partner users and partner super users who are in the same role. Manager and user roles are below them in the hierarchy.
- Partner Manager: They can access records of all partner users and partner super users in the same role. User roles below them in the hierarchy.
- Partner User: They can access records of all partner users and partner super users in the same role (User roles only).
4.2.2 How to enable the Grant Super Access for Customer Community Plus users:
Add the Portal Super User permission to a permission set and assign it to Customer Community Plus users so that they get access to their account and can view and edit all of its contacts and cases without having the ability to manage other external users.
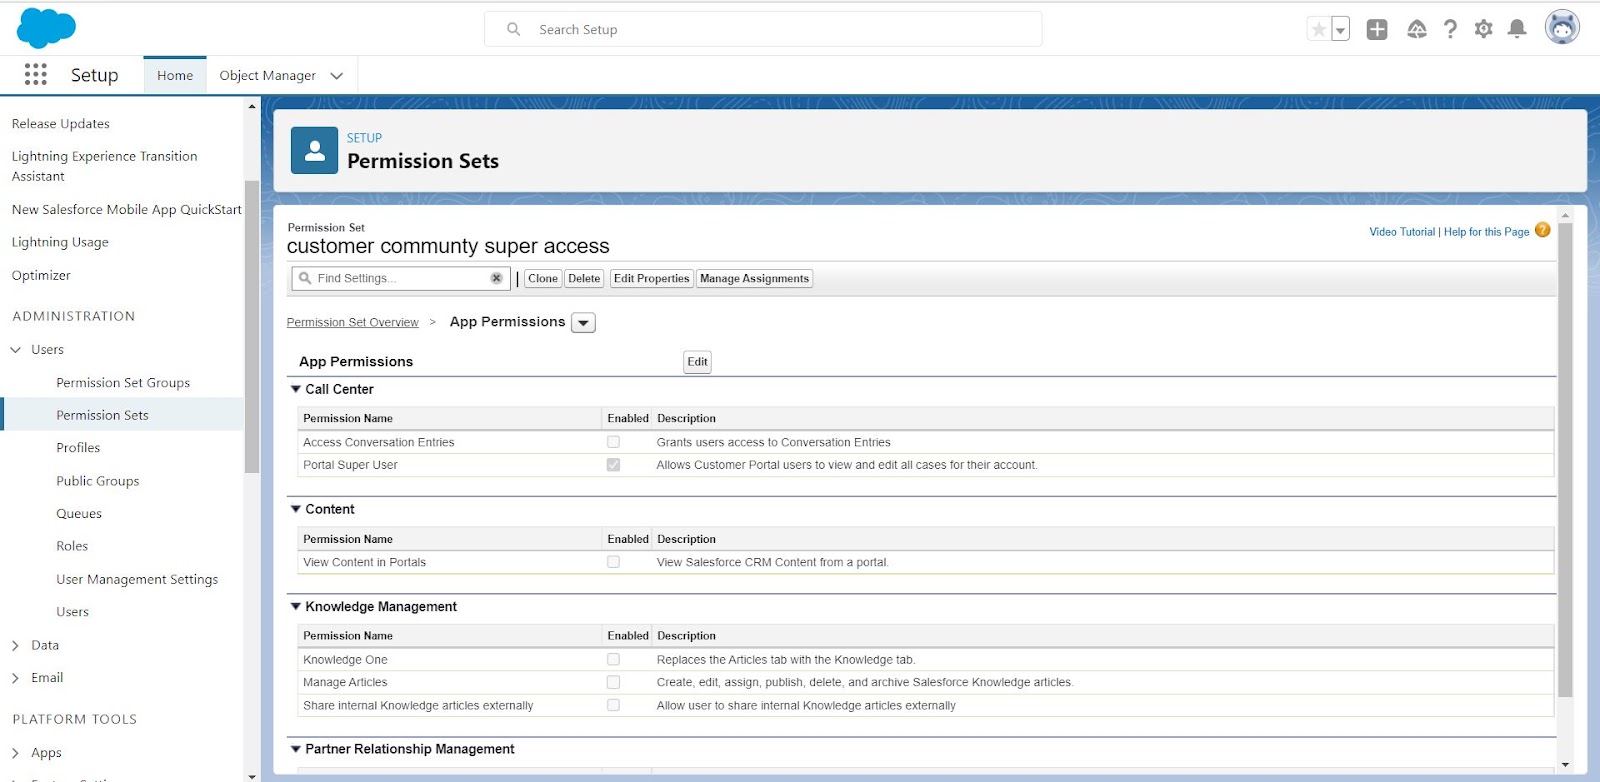
- From Setup, search for Permission Sets in the Quick Find box, then select Permission Sets.
- Either create or clone a permission set.
- In the App Permissions section, add the Portal Super User permission.
- Click Save.
- Assign the permission set to your Customer Community Plus users by clicking Manage Assignments and then adding the appropriate users.
The Portal Super User permission lets users with the Customer Community Plus license do the following on their accounts:
- View, edit, and transfer all cases
- Create cases for contacts
- View and edit all contacts, whether communities-related or not
- View account details when they’re the contact on the case
4.3 Limitations:
Superuser access applies only to cases, leads, custom objects, and opportunities.
Sharing rules are not supported by the customer community which is why sharing sets come into the picture.
- This is available only to communities for sharing records. We will share with community license types and community users.
- A sharing set grants site users access to any record associated with an account or contact that matches the user’s contact or account.
- Sharing sets are engaged towards sharing records owned by other users with Community users
Syntax: [ My User.Contact.AccountId = x, the AccountId on this record = x, ].
5.1 Use Case:
- For example, I want to share Student Object records to an Account(college) related to One user(department) to another User(examination section).
5.2 Implementation:

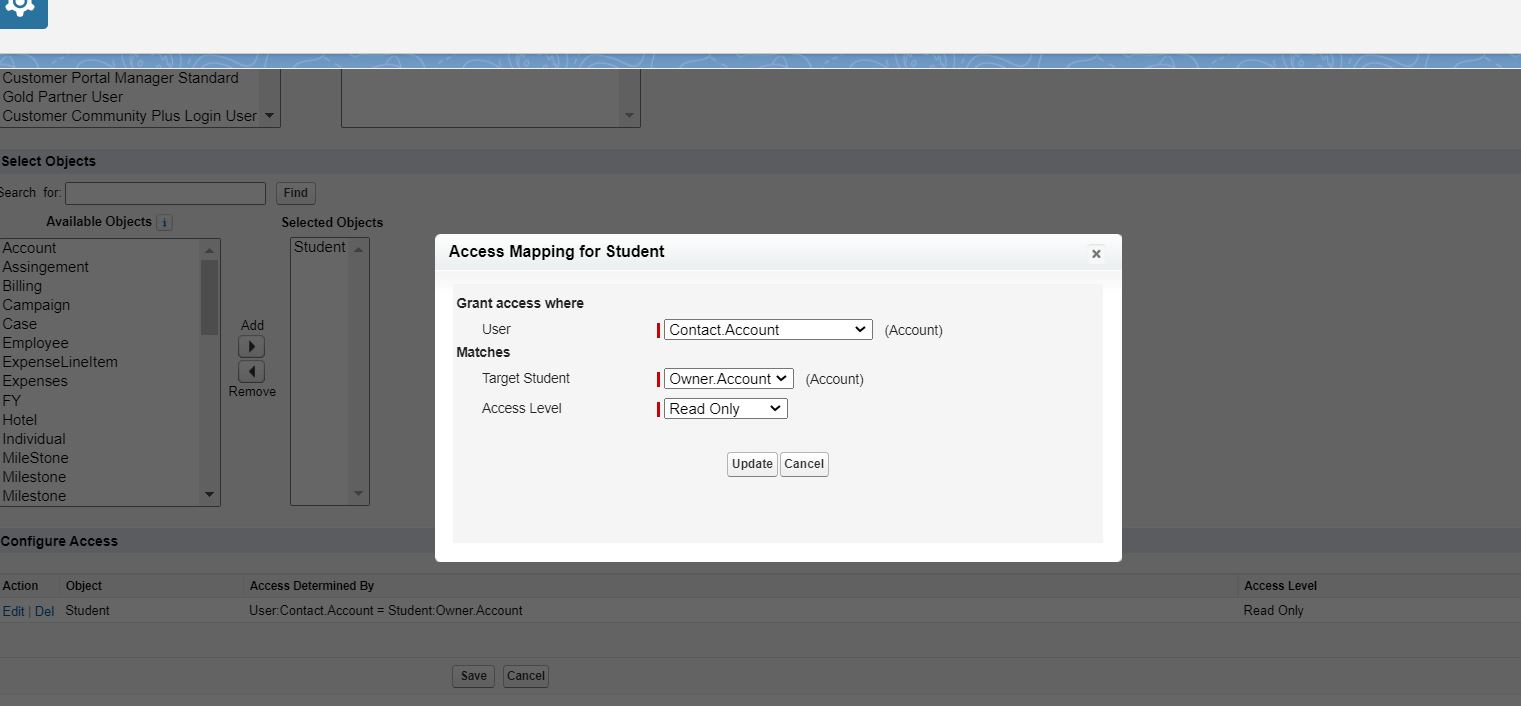
5.2 Limitations:
- You need to know that you can only have one Sharing Set per Community Profile. So that means you create the sharing set for the profile and all the objects are within that sharing set.
- External default access for objects must be Private.
- If custom objects are not related to an account or contact we can't write multi-level parent access.
- Using sharing sets we can't share records for internal users.
We use sharing sets to share records with community portal users. We can't use the sharing sets to share the records with the Internal users. That's where sharing groups come into the picture.
- It allows you to share records owned by high-volume community portal users with internal and external users.
- It applies across communities associated with sharing sets.
- Members of this sharing group can access any records owned by high-volume portal users in the associated sharing set.
High-volume users are limited-access Experience Cloud site users, intended for orgs with thousands to millions of external users. Because high-volume community users don’t have roles, performance issues associated with role hierarchy calculations are eliminated. Use a share group to share records owned by high-volume users. Share groups allow sharing of records owned by community users with other users.
6.1 Use case:
Internal Users should have access to read all cases associated with their customer accounts.
6.2 Implementation:
- To create a Sharing Group, you must first create a Sharing Set, then click on its name to access the Sharing Group sub-tab.
- Click on the Share Group settings tab. In this sharing group add internal users and also partner users.
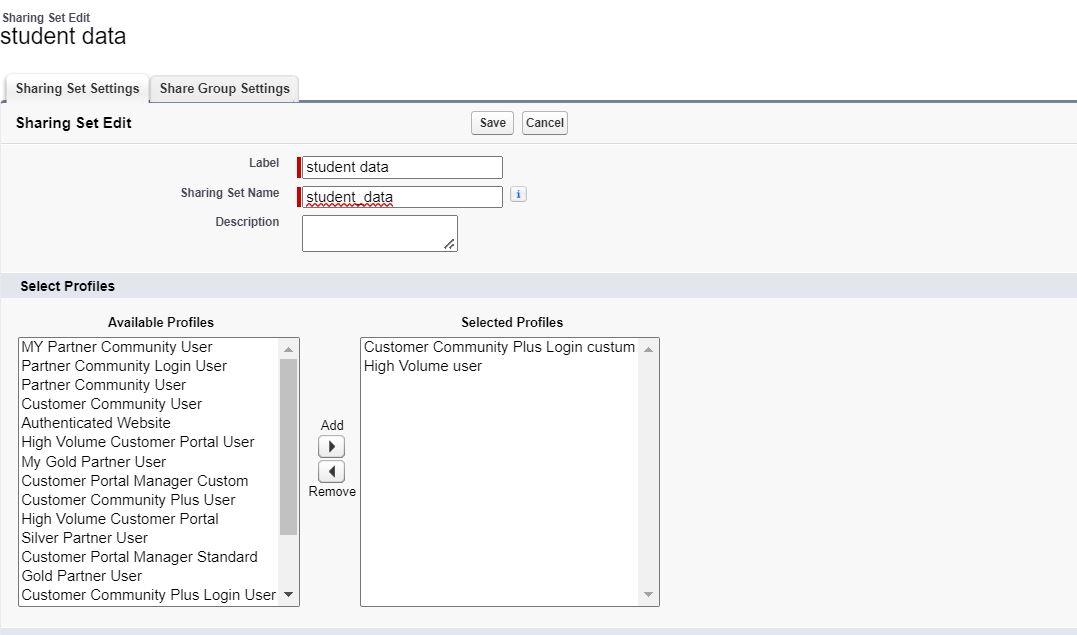
- After that, we add the internal user's roles to public groups, or partner users into sharing groups.
- After that activate the sharing group and make sure high-volume community users are added to the profile section.
6.3 Limitations:
- In sharing sets, all objects will be shared so that members' access to the records is not restricted to the objects defined in the sharing set.
- It supports only the Customer community.
7. External Account Hierarchies:
7.1 Use Case:
By using sharing sets we can share records from one community user to another community user, but we cannot share records with multilevel parents. That is where External Account Hierarchies come into the picture. External account hierarchies allow the users to share records between the community users of one company and to community users of another company.
For example:
Your customers and partners have parent-to-child companies and you want to share the child company records with the parent company. With that said, external account hierarchies are available for only customer community plus, partner community, and external apps.
7.2 Implementation:
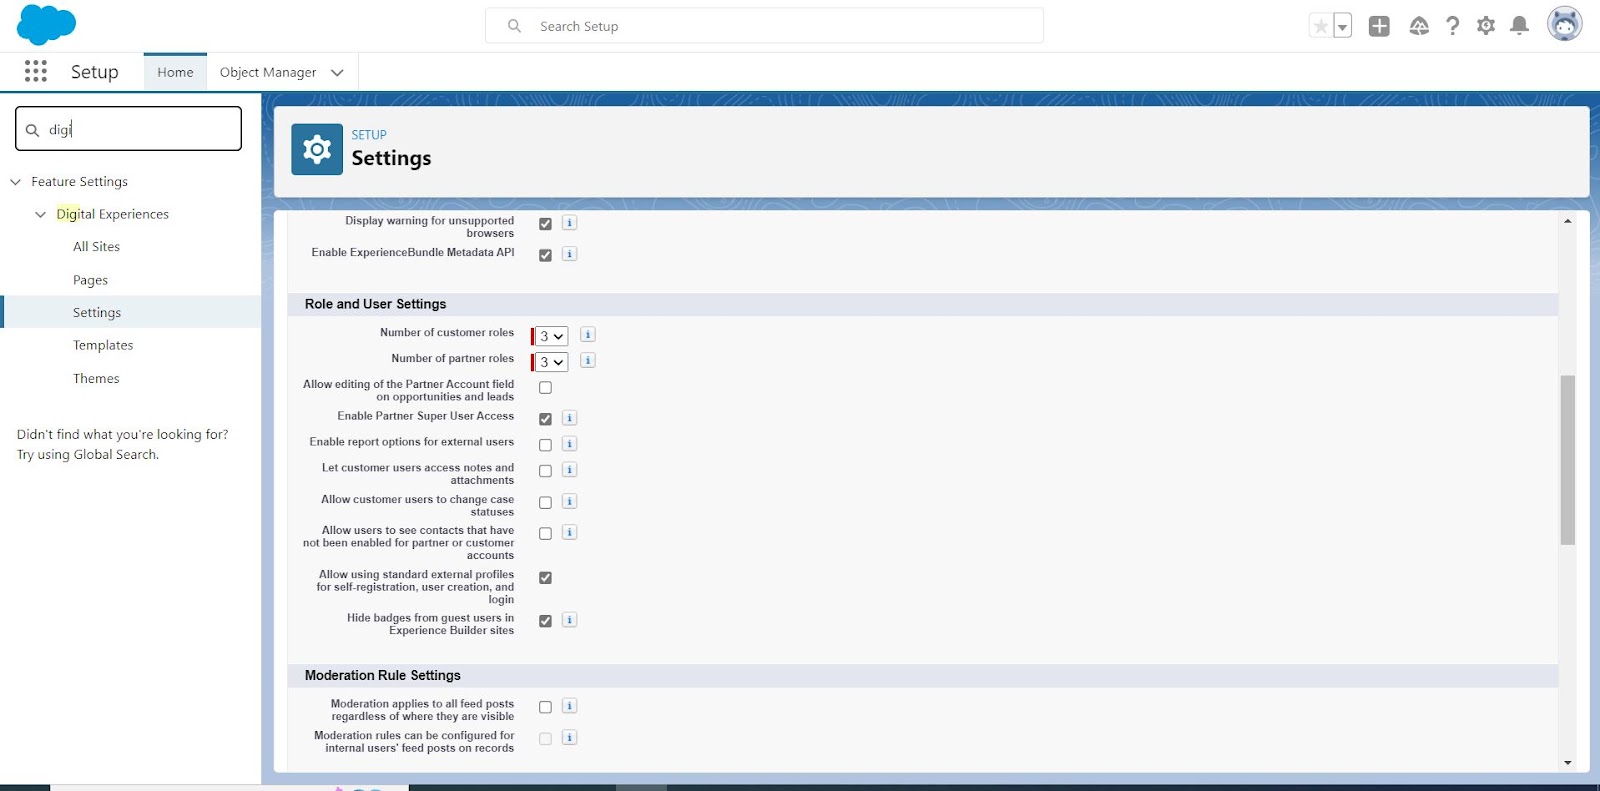
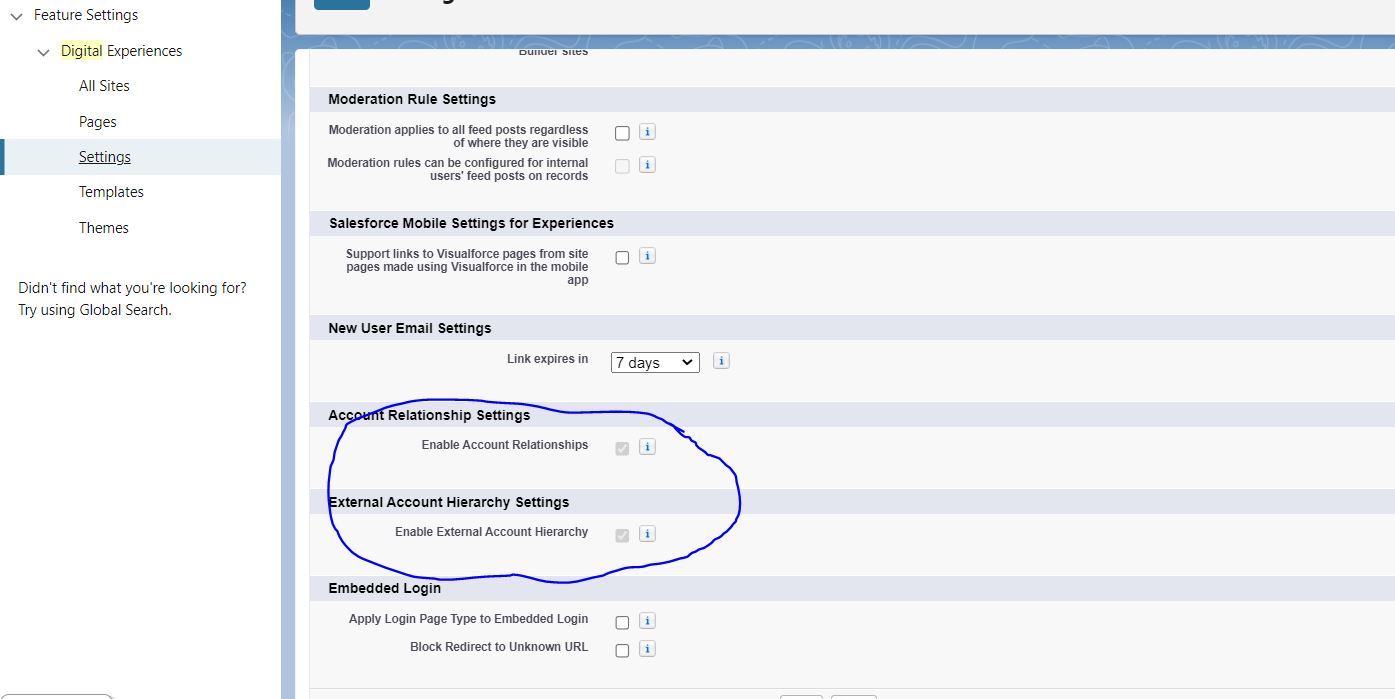
Click on Setup then in the quick search bar type Digital Experience, and under Digital Experience click Settings. Enable ‘Enable External Account Hierarchies’ and give the partner /customer roles can now be changed to more than one role.
Note: Once you enable this feature you can't disable it.
Note: In this case, the Number of Partner roles or Customer roles should be set to more than one.
Then go to the App Launcher, in the search bar type External Account Hierarchy, click on the External Account Hierarchy tab, and click on the New button.
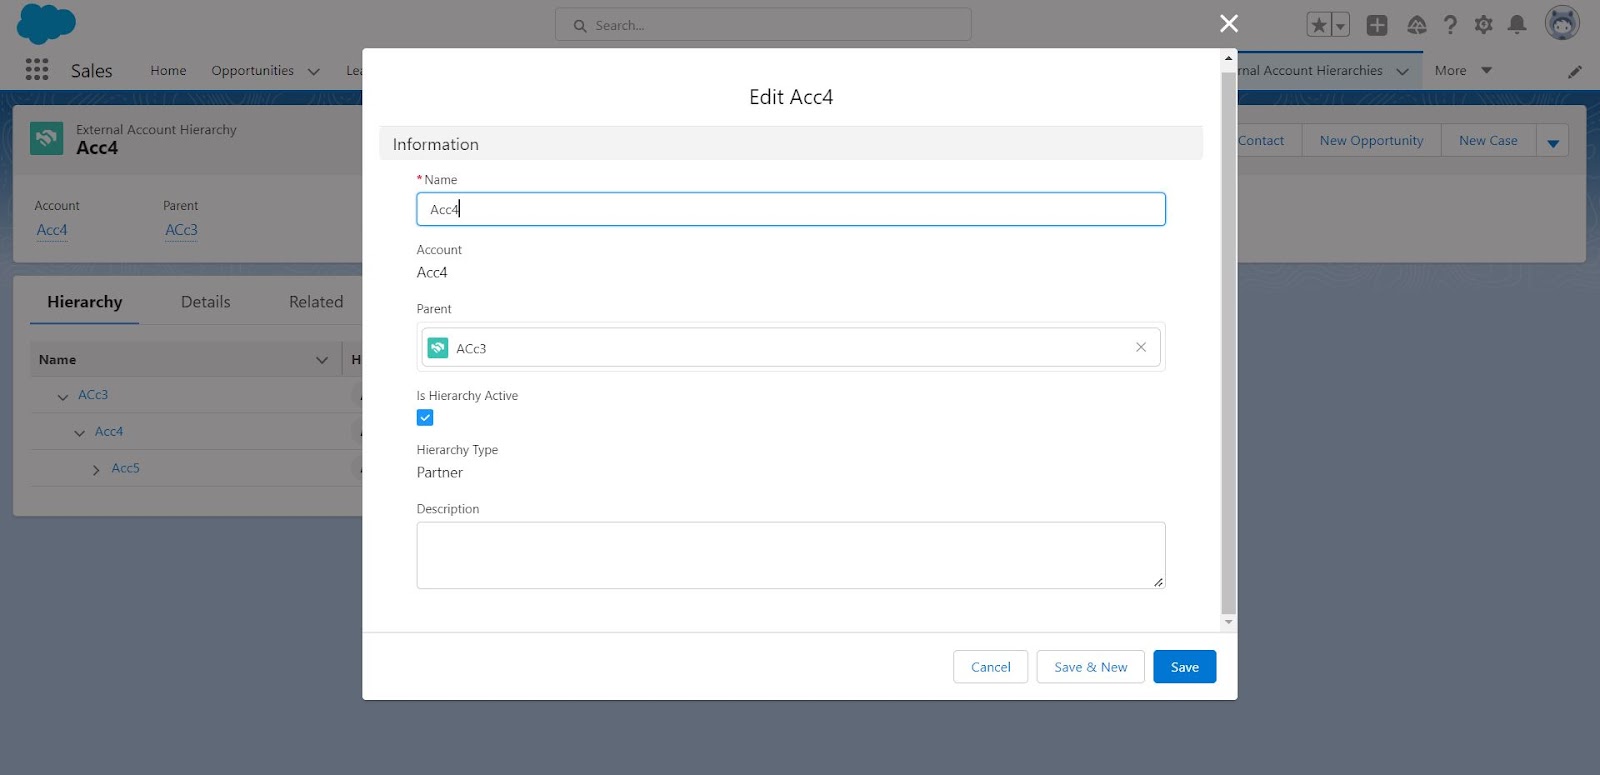
After that, it will display the above screenshot. Fill in the Name field and choose the account in the Parent field. Enable the "Is Hierarchy Active" check box.
Note: The chosen account must have the Portal Roles and also the ‘Is Hierarchy Active’ checked.
Click on the save button and then the record is created. The hierarchy will look like this.
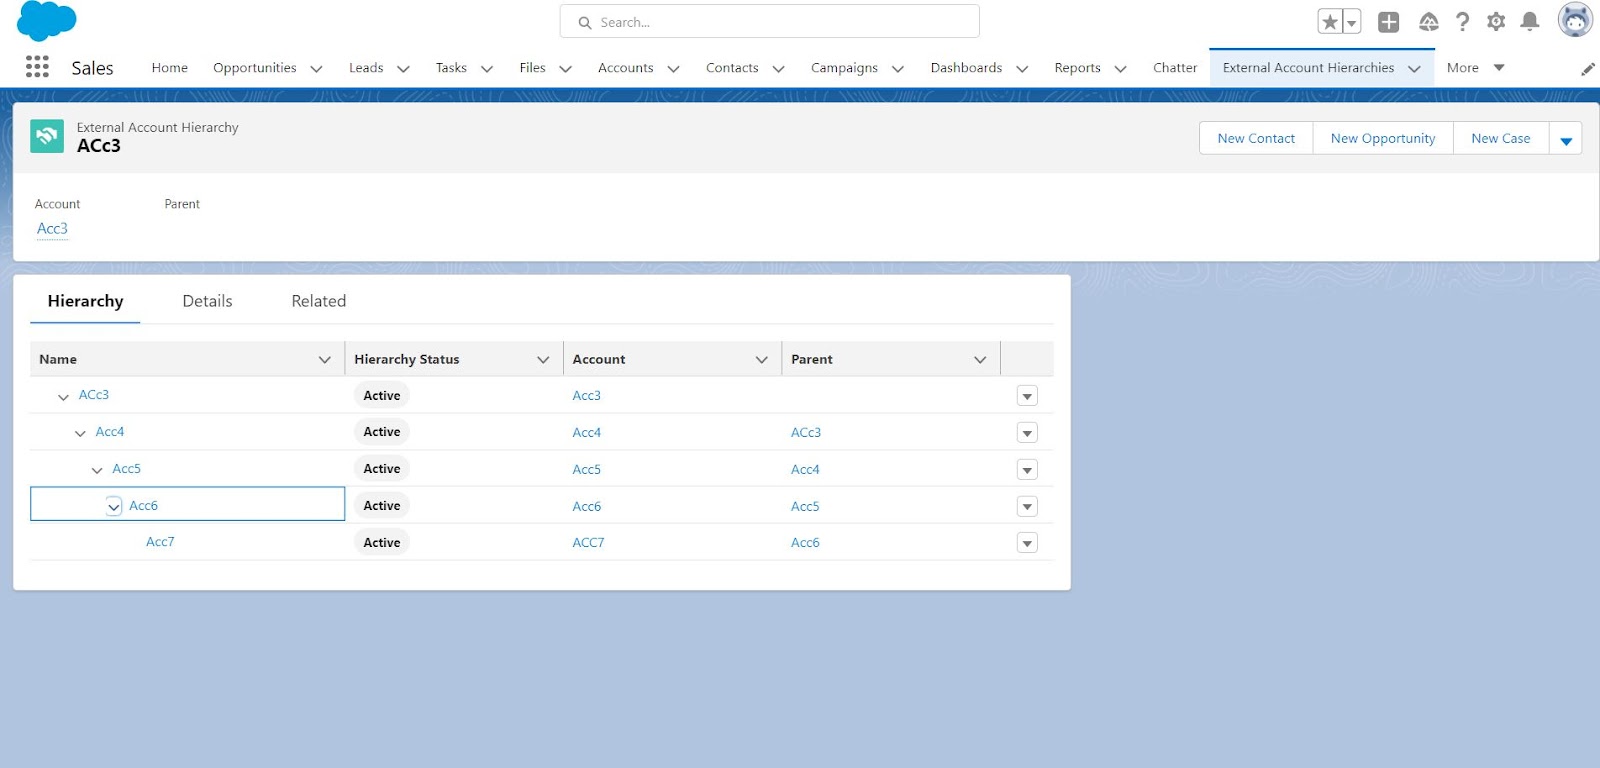
Note: After all this is done the child's account-related records will be shared with the parent's account. But child Account data is shared with the highest role only at each level(immediate partner account only) and account-related hierarchy only.
7.2 Limitations:
- It does not give access to all account-related users.
- We can create a maximum of up to five levels in the hierarchy.
- Accounts used in the external account hierarchy can't be merged with another account.
- The hierarchy can contain only one account type either a Partner or a Customer Account. It does not support mixed accounts.
- A partner account or Customer Account can be only one active external account hierarchy at a time.
- It supports only business accounts(It contains the roles) not supported person accounts(it does not have roles ).
There are situations where the business requirement is too complex and standard sharing rules provided by Salesforce will not work. In this situation, Apex-managed sharing comes into the picture.
8.1 Use Case:
For example, using sharing sets account and Contact not related objects only we can’t share at the parent level company but account-related objects we can share at the parent level. Using the external account hierarchy we can share records for the parent level but the parent level highest role user only can see the records and we can add up to 5 levels only. But using apex sharing we can share records for parent levels above 5 and at the parent level, all users can see the records.
Apex-managed sharing provides developers with the ability to support particular sharing requirements programmatically via Apex code. To access sharing programmatically, you must use the shared object associated with the custom or standard object for which you want to share. For example, AccountShare is the sharing object for the Account object, and ContactShare is the sharing object for the Contact object.
In addition, all custom object sharing objects are named as follows, where Student is the name of the custom object: “Student__Share”. Objects on the detail side of a master-detail relationship don’t have an associated sharing object. The detail object record’s access is determined by the master’s sharing object and the relationship’s sharing setting. A shared object includes records supporting all three types of sharing: user-managed sharing, Force.com managed to share, and Apex-managed sharing.
Sharing is granted to users implicitly through organization-wide defaults, the role hierarchy, and permissions such as the “View All” and “Modify All” permissions for the given object, “Modify All Data” and “View All Data,” are not tracked by this sharing object.
8.2 Implementation:
ParentId:
The ID of the record is being shared and this field can't be updated.
User Or GroupId:
The ID of the user or group to whom you are granting the access and also this field can't be updated.
Access level:
The level of access that the specified group or user has. Valid values of apex sharing are Edit, Read.
Row Cause:
The Reason determines why the user or group is being granted access.
8.3 Limitations:
- Apex sharing reason created only for custom objects. Apex sharing reason is not available for standard objects instead of that we will use the Row Cause Manual.
- Row cause Manual for standard objects when the owner has changed the apex-based sharing would be lost. Custom object apex sharing reason when the owner is changed apex-based sharing can't be lost.
Account relationship data-sharing rules allow you to define the criteria based on your requirements that are used to share object records with an external account. The data sharing rule defines the relationship type, the information that is shared, and the record access given to the account gaining access.
Once you’ve created your data-sharing rule, you can use it to share data with an external account by creating an account relationship. The account relationship comprises the account sharing information, the account accessing those records, and the type of relationship they have.
Account relationship data-sharing rules can apply to; leads, campaigns, accounts, cases, contacts, custom objects, opportunities, orders, partner fund allocations, partner fund claims, partner fund requests, and partner marketing budgets.
9.1 Use Case:
For example, if we have two branches(accounts) we will share one branch(account) records with another branch.
9.2 Implementation:
From Setup, search for Digital Experiences in the Quick Find box. Select Digital Experiences and Click Settings. Check Enable Account Relationships and save your changes
- Then go to the account object click on the page layout section and add the ‘Account Relationship: Account From & Account Relationship: Account To ‘ in the related section.
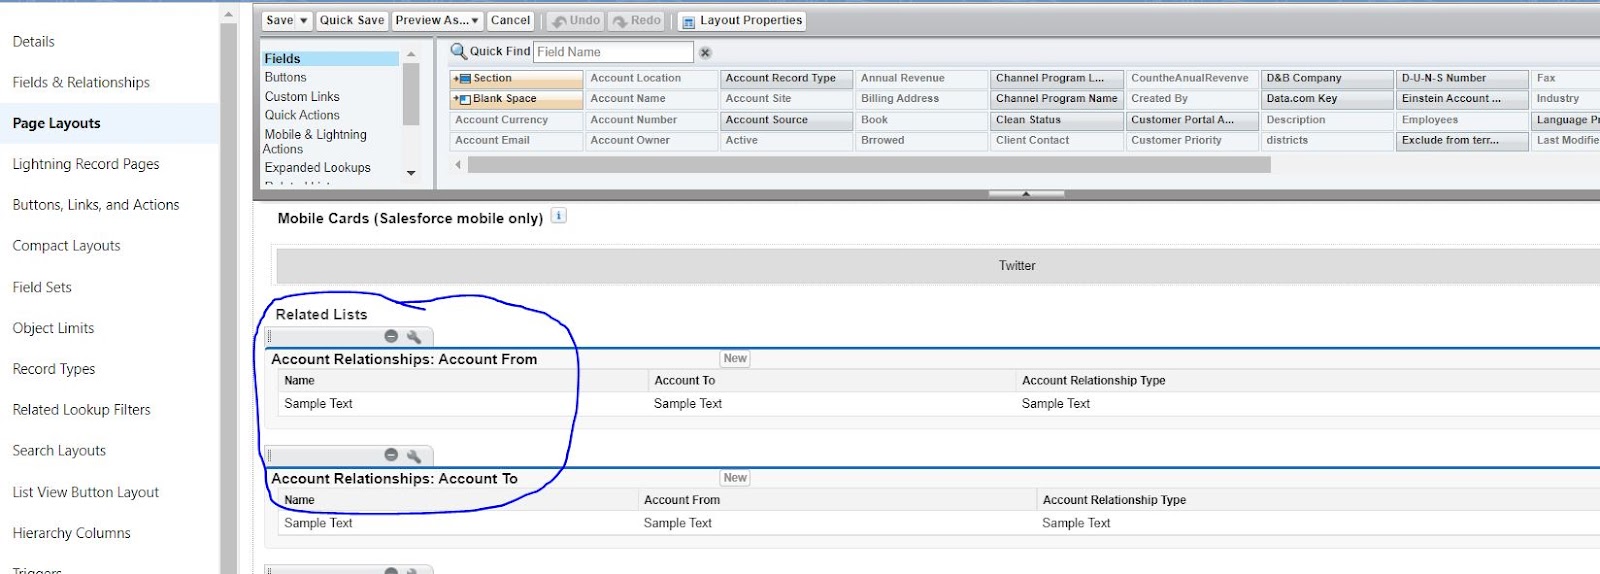
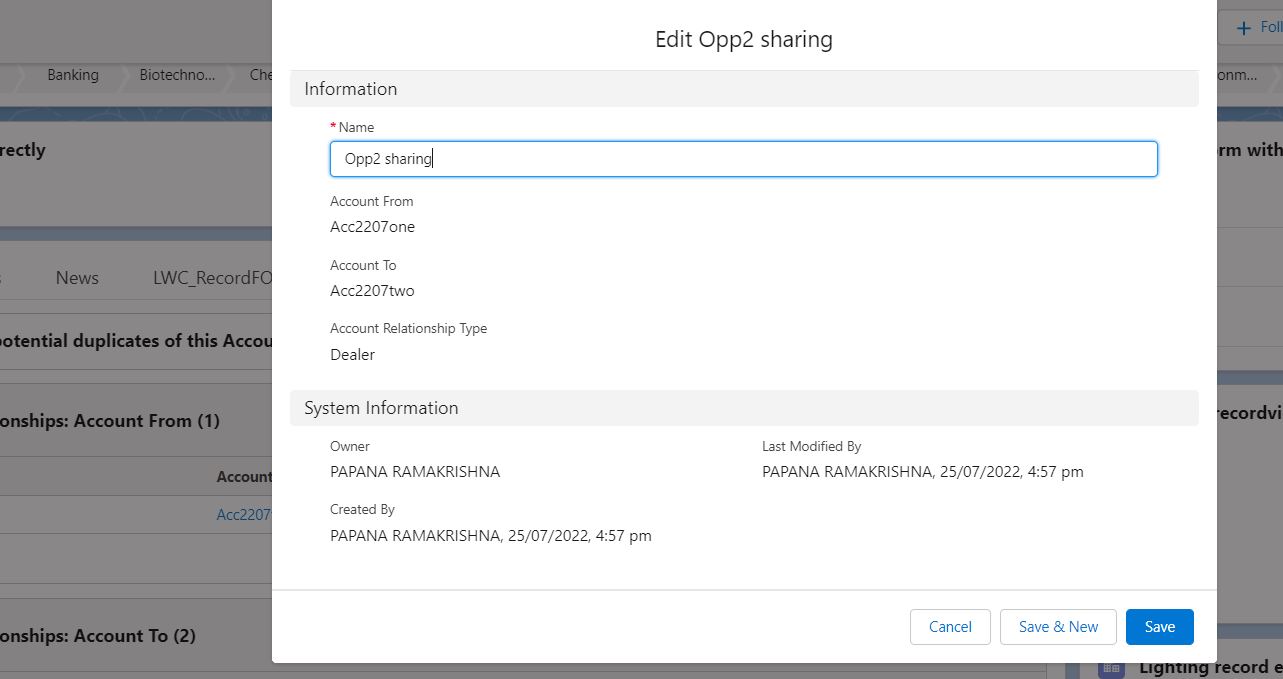
- Go to the Accounts tab and open the Accounts records. Go to the related section, and you will see the ‘Account Relationship: Account From & Account Relationship: Account To ‘ then click on any one and write the condition which contains account-related data.
- Go to Setup and enter Account Relationship in the Quick Find box, then click Account Relationship Data Sharing Rule Settings | New. Enter the same value in the Account Relationship Type field as the account relationship that is using this rule.

- Specify the type of access the account being shared with (Account From) gets to the sharing account’s (Account To) data, in the Access Level field. Search for the type of object that is being shared in the Object Type field.
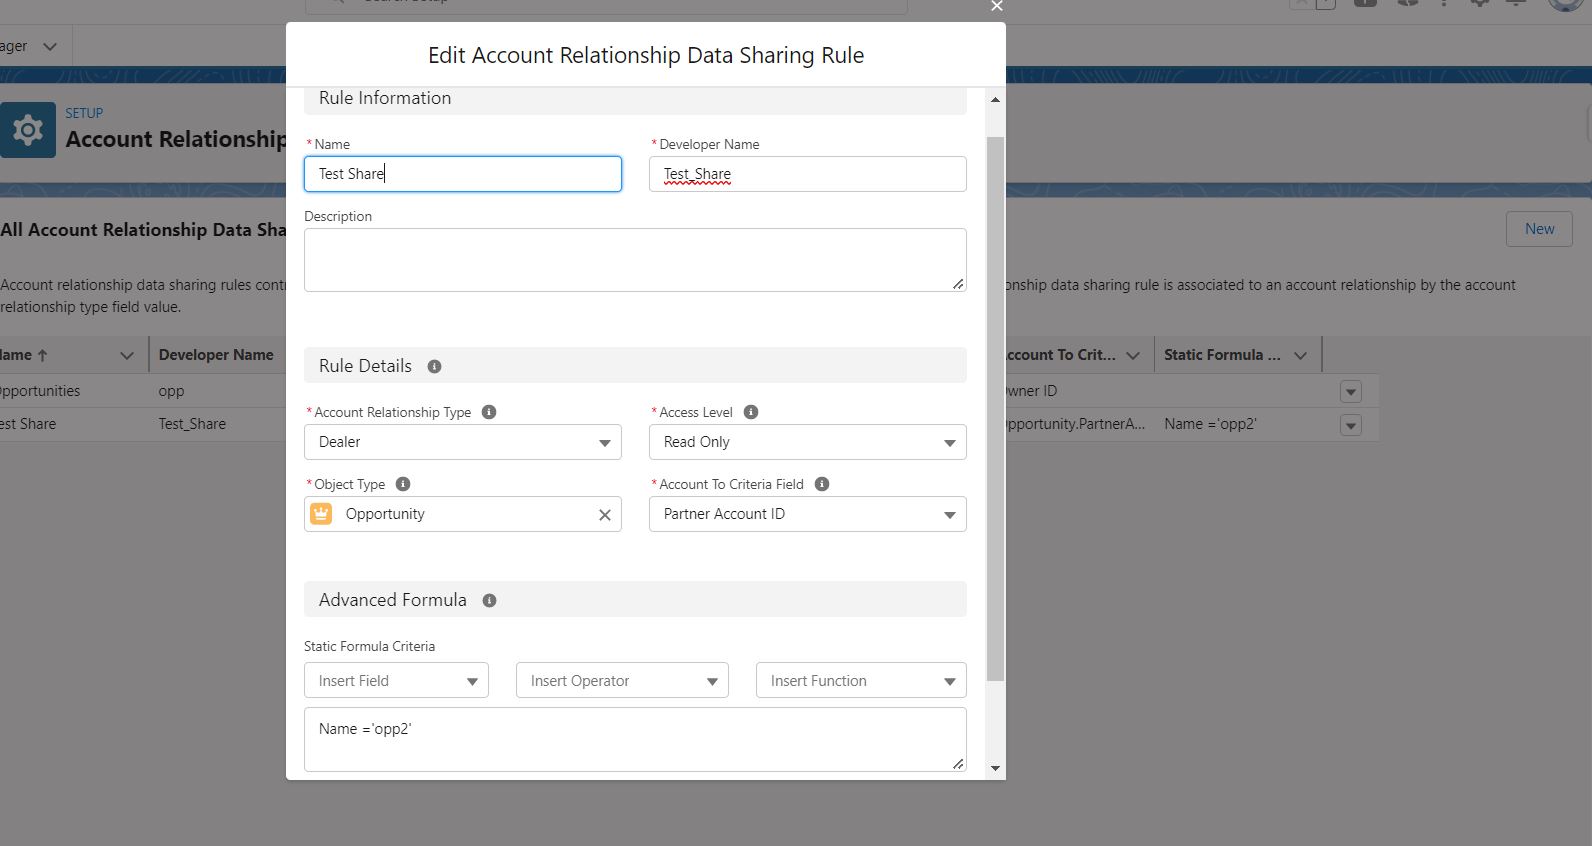
Then click on save.
9.3 Limitations:
- After an account relationship is saved, only its name can be updated. To make further changes, first, delete the account relationship and create a new one relationship.
- An account that is part of an account relationship can’t be merged or deleted.
- If sharing is not enabled for orders, then you can’t create account relationship data-sharing rules for them.
- Account Relationships don’t share data that is owned by a queue.
- Account relationships can’t share data with accounts that use account role optimization.
- Account relationships do not share data from High Volume Portal Users.
Data sharing and visibility are a critical aspect of the Salesforce security architecture, and more so for external users. Unauthorized access to data can lead to security and compliance issues which can have far-reaching impacts. Thus, it is very critical to diligently implement sharing mechanisms within your Salesforce org. Use the above sharing methods individually or in combination to create external sharing mechanisms that will protect your data from unwanted access.
Cloud Peritus has been at the forefront of innovation since its inception and has since played an integral role in delivering game changing solutions to its clients time and again, resulting in 5 star reviews from across the board.
Feel free to check us out at Salesforce AppExchange.
For more information and to book a free consultation on how we can help transform your business. Contact us at info@cloudperitus.com